
I'm loving my free time this summer!! But obviously I can't keep from thinking about next year!! I'm currently writing a blog post about creating a fantastic classroom library and I wanted to give a quick tutorial about how to make labels using the latest Microsoft Word.

First, open Word.

Then, click on Blank document.


Click on the Mailings tab.
Then you will click on the labels button in the top left corner under the Home tab.


Here is where you look on the package of labels you bought and find two things: The brand (or off brand) and the number of the label (usually in one of the front cover corners on the package). My package looks like this:
 My brand is Avery and my number is 8160.
So on the pop up screen
 I choose Avery US Letter on the drop down menu next to Label vendors and then choose my Product number on the scroll list. Click OK.
You're back on this screen:
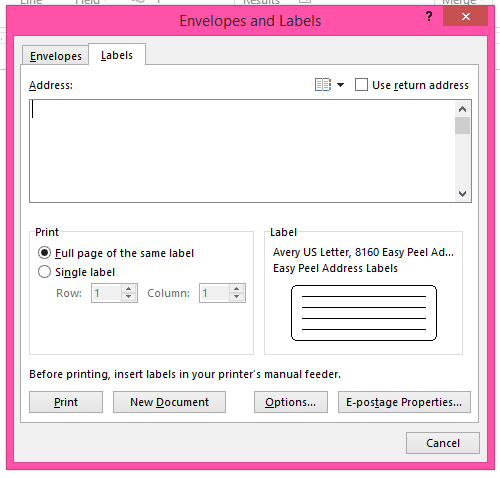 Now you have two choices: 1. Make a blank page of the same label or 2. Type in the address in the Address section.
For Number 1: Make sure the circle next to full page of the same label is chosen and then click on New Document.
Here's your new document with a full page of the same size blank label

Or for number 2: Type in address and then click new document and a whole page of the same label is displayed.

If you chose option 1, you can type in different addresses or labels or whatever you want and personalize the page. Option 2 is great for return address labels.
Hope this helps you with your label making needs. Thanks!!

2

First, open Word.
Then, click on Blank document.
Click on the Mailings tab.
Then you will click on the labels button in the top left corner under the Home tab.
This screen pops up.
Click on the Options button at the bottom of the pop up screen.
Then this new screen pops up.
So on the pop up screen
You're back on this screen:
For Number 1: Make sure the circle next to full page of the same label is chosen and then click on New Document.
Here's your new document with a full page of the same size blank label
Or for number 2: Type in address and then click new document and a whole page of the same label is displayed.
If you chose option 1, you can type in different addresses or labels or whatever you want and personalize the page. Option 2 is great for return address labels.
Hope this helps you with your label making needs. Thanks!!


