Showing posts with label technology. Show all posts

Tech Tip Tuesday: How to Make Labels Using Microsoft Word

I'm loving my free time this summer!! But obviously I can't keep from thinking about next year!! I'm currently writing a blog post about creating a fantastic classroom library and I wanted to give a quick tutorial about how to make labels using the latest Microsoft Word.


First, open Word.

Then, click on Blank document.

Click on the Mailings tab.
Then you will click on the labels button in the top left corner under the Home tab.
This screen pops up. 

Click on the Options button at the bottom of the pop up screen. 
Then this new screen pops up. 

Here is where you look on the package of labels you bought and find two things: The brand (or off brand) and the number of the label (usually in one of the front cover corners on the package). My package looks like this:
My brand is Avery and my number is 8160.
So on the pop up screen
I choose Avery US Letter on the drop down menu next to Label vendors and then choose my Product number on the scroll list. Click OK.

You're back on this screen:
Now you have two choices: 1. Make a blank page of the same label or 2. Type in the address in the Address section.

For Number 1: Make sure the circle next to full page of the same label is chosen and then click on New Document.
Here's your new document with a full page of the same size blank label

Or for number 2: Type in address and then click new document and a whole page of the same label is displayed.

 If you chose option 1, you can type in different addresses or labels or whatever you want and personalize the page. Option 2 is great for return address labels.

Hope this helps you with your label making needs. Thanks!!

2

Tech Tip Tuesday: QR Codes for Listening Center

Hello! Just a quick jot tonight to share my latest remake of my listening library.
QR Codes!


I have collected A LOT of books on CD over the years and the baskets of bags aren't very attractive on the counter. Here is a picture from the beginning of the year (before the children got their hands on them!) and before I ordered more a lot more from Scholastic. I'm a sucker for new books.


It's just overflowing now. 
So I'm giving it a makeover.

Have you ever used QR codes in your classroom? They are so fun! The kids love to use the iPads and scan and listen to audiobooks.

Here's how to get started:
Put all the audiobooks onto your computer in .mp3 format.
I use Windows Media Player. Insert the CD and open Windows Media Player. Click on Rip Settings, then Format, then choose MP3
Then click Rip CD.
Once it's uploaded to your computer, you'll need to get a URL for the QR code. To get that, you'll need to upload the audio file to a file hosting site like Dropbox.
Sign in or create account.
Add a file to the Dropbox.
Once it's uploaded, click on Share.

This box pops up and there's the link you need!


Copy it.

Now, find a QR creator website that you like. I like QR Stuff. SUPER easy to use. Type in the web address and the screen you need immediately pops up.
See? Easy Peasy.

Paste the link, choose the Encoding Options, and BAM - there's your code. Click to download the code as a picture. 

I print out the picture and tape it to the back of the book. The kids can scan the code and then listen while reading along. No more CDs and paper cases and books in bags.


I'm loving this new system! 

How do you use QR codes? Anything new and easy? 

Happy teaching,
1

Let's go Digital! Interactive Notebooks with NO paper!

As you may have heard I'm moving up from first grade to SIXTH grade. I'll be teaching Media Literacy and Video Production. Yup. No more primary for me :(

I'm a little sad, but also a little excited! I'm sure as the school year moves closer I'll be MORE excited! Stay tuned for the middle of July!

For the time being, I'm going to share with you an activity I've been working on. I LOVE interactive notebooks. However, they take up a lot of time and a lot of paper and a lot of glue. I've got to spend lots of days training my firsties on how to properly cut and paste the activities in their notebooks.


This activity is one that I've had in my paper interactive notebooks for awhile, but I've moved it to a digital platform!

Check it out: 

There are letter tiles off to the side that the students click and drag to build short a words. After building a word, they type the word in the table, drag the letters back, and do it again. When they are finished, I've included instructions on how to share the activity with me. 

I've spent a few weeks at the beginning of the school year training my students on how to use Google. How to sign in, how to create docs or slides or drawings, how to share things with me, etc. We've practiced dragging, clicking, typing, inserting, etc. 

Now, your students won't necessarily need to share the finished activity with you or maybe they all have their own Google accounts or you are using Google Classroom. That's great! They can all get their own copy through Classroom or you can email to their account and they can save their file in their Drive. If not, just have them log in under your Gmail and type their name on their own copy. 

I've got short a, e, i, o, and u slides. The kids have an interactive experience, practice a skill, and have fun while doing it! The best part? I didn't have to make copies or clean up a mess!

All you need is a computer, Internet access, and a free Google account. 


You can grab your own copy of this activity {HERE}. It will prompt you to make a copy first. Sometimes on Macs, you may have to go to File>Make a Copy afterwards. I'm not sure of this kink, but I am sure that Google is most likely working on it. 

What do you think? I'm working on some more digital interactive notebooks which will be in my TpT store sometime this summer. 
Here is a peek: 


Let me know what you think!
0

Let's go Digital! Interactive Notebooks with NO paper!

As you may have heard I'm moving up from first grade to SIXTH grade. I'll be teaching Media Literacy and Video Production. Yup. No more primary for me :(

I'm a little sad, but also a little excited! I'm sure as the school year moves closer I'll be MORE excited! So there will be lots of changes coming soon. Here is a sneak peek:

Stay tuned for the middle of July!

For the time being, I'm going to share with you an activity I've been working on. I LOVE interactive notebooks. However, they take up a lot of time and a lot of paper and a lot of glue. I've got to spend lots of days training my firsties on how to properly cut and paste the activities in their notebooks.

This activity is one that I've had in my paper interactive notebooks for awhile, but I've moved it to a digital platform!

Check it out: 

There are letter tiles off to the side that the students click and drag to build short a words. After building a word, they type the word in the table, drag the letters back, and do it again. When they are finished, I've included instructions on how to share the activity with me. 

I've spent a few weeks at the beginning of the school year training my students on how to use Google. How to sign in, how to create docs or slides or drawings, how to share things with me, etc. We've practiced dragging, clicking, typing, inserting, etc. 

Now, your students won't necessarily need to share the finished activity with you or maybe they all have their own Google accounts or you are using Google Classroom. That's great! They can all get their own copy through Classroom or you can email to their account and they can save their file in their Drive. If not, just have them log in under your Gmail and type their name on their own copy. 

I've got short a, e, i, o, and u slides. The kids have an interactive experience, practice a skill, and have fun while doing it! The best part? I didn't have to make copies or clean up a mess!

All you need is a computer, Internet access, and a free Google account. 


You can grab your own copy of this activity {HERE}. It will prompt you to make a copy first. Sometimes on Macs, you may have to go to File>Make a Copy afterwards. I'm not sure of this kink, but I am sure that Google is most likely working on it. 

What do you think? I'm working on some more digital interactive notebooks which will be in my TpT store sometime this summer. 
Here is a peek: 


Let me know what you think!

0

QR Codes for Listening Center

Hello! Just a quick jot tonight to share my latest remake of my listening library.
QR Codes!


I have collected A LOT of books on CD over the years and the baskets of bags aren't very attractive on the counter. Here is a picture from the beginning of the year (before the children got their hands on them!) and before I ordered more a lot more from Scholastic. I'm a sucker for new books.
It's just overflowing now. 
So I'm giving it a makeover.

Have you ever used QR codes in your classroom? They are so fun! The kids love to use the iPads and scan and listen to audiobooks.

Here's how to get started:
Put all the audiobooks onto your computer in .mp3 format.
I use Windows Media Player. Insert the CD and open Windows Media Player. Click on Rip Settings, then Format, then choose MP3
Then click Rip CD.
Once it's uploaded to your computer, you'll need to get a URL for the QR code. To get that, you'll need to upload the audio file to a file hosting site like Dropbox.
Sign in or create account.
Add a file to the Dropbox.
Once it's uploaded, click on Share.

This box pops up and there's the link you need!


Copy it.

Now, find a QR creator website that you like. I like QR Stuff. SUPER easy to use. Type in the web address and the screen you need immediately pops up.
See? Easy Peasy.

Paste the link, choose the Encoding Options, and BAM - there's your code. Click to download the code as a picture. 

I print out the picture and tape it to the back of the book. The kids can scan the code and then listen while reading along. No more CDs and paper cases and books in bags.


I'm loving this new system! 

How do you use QR codes? Anything new and easy? 

Happy teaching, 
0

How to Make Labels Using Microsoft Word

I'm loving my free time this summer!! But obviously I can't keep from thinking about next year!! I'm currently writing a blog post about creating a fantastic classroom library and I wanted to give a quick tutorial about how to make labels using the latest Microsoft Word.

First, open Word.

Then, click on Blank document.

Click on the Mailings tab.
Then you will click on the labels button in the top left corner under the Home tab.
This screen pops up. 

Click on the Options button at the bottom of the pop up screen. 
Then this new screen pops up. 

Here is where you look on the package of labels you bought and find two things: The brand (or off brand) and the number of the label (usually in one of the front cover corners on the package). My package looks like this:
My brand is Avery and my number is 8160.
So on the pop up screen
I choose Avery US Letter on the drop down menu next to Label vendors and then choose my Product number on the scroll list. Click OK.

You're back on this screen:
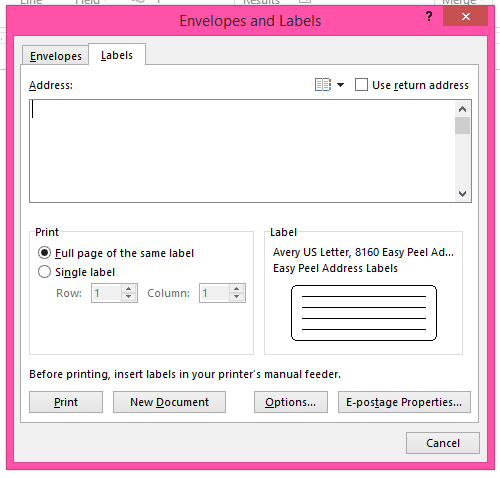
Now you have two choices: 1. Make a blank page of the same label or 2. Type in the address in the Address section.

For Number 1: Make sure the circle next to full page of the same label is chosen and then click on New Document.
Here's your new document with a full page of the same size blank label

Or for number 2: Type in address and then click new document and a whole page of the same label is displayed.

 If you chose option 1, you can type in different addresses or labels or whatever you want and personalize the page. Option 2 is great for return address labels.

Hope this helps you with your label making needs. Thanks!!

Jessica
0
Powered by Blogger.
Back to Top