Showing posts with label tutorial. Show all posts

Talking Tech Tutorial: GIF for Your TpT Store!

Hi friends! Have you seen the latest trend on TpT? Rotating Quote pictures? They are popping up everywhere! Thought I would share with you how I made mine!

GIF for TpT Store Front

I'm starting a new series on my blog for the school year: Talking Tech with Pride and Primary! 
Talking Tech with Pride and Primary banner
I'm hoping to post every other Saturday with a new Tech tutorial or a new tech software or platform to share with you and your classroom or personal life!

So let's get started! First you have to make your designs. I use PowerPoint, but you can design in whatever program you are most comfortable with, as long as the finished dimensions are correct (about 600 pixels in width, height between 100-260 pixels). 

Open PowerPoint.
How to make a GIF in Powerpoint

Insert a rectangle that is 7” x 3.5”.

You will need to fill the rectangle with the same color as the quote section on TpT. To do that, go to the Format tab, then to Shape Fill, and click on More Colors.

On the custom tab, make the fill color R 241 G 241 B 241. Click OK. 
 
Clear the outline on the rectangle by clicking on the Format Tab, the Shape Outline, then click on No Outline.


Make your design inside the rectangle.  


Group (select all items and the rectangle) and save your design as a picture.

Right click on grouped design and click Save as Picture. Name your file and save it to a location you can easily find. The desktop is usually a good spot.  

Now we have to resize and skew to the correct dimensions. 

Open in Paint. You can also use Photoshop or another similar program.

Do you have extra space? We can get rid of that! But first, let's resize it. 

Click Resize on the Home tab. 

Click the Pixels circle. Change the Horizontal size to 600. The vertical size will change automatically to something around 240-270ish. Click OK.

Now get rid of the white space. 


Then save the picture! I press ctrl+S. It’s the easiest way to save it under the same file name and same location, just a different size.

Repeat for the rest of your pictures. I made 4 pictures. You can make as many as you would like.

It’s ready to upload to GIF maker. Go to http://gifmaker.me/ Click on Upload Images. 

Find your pictures you made and saved. Upload.

Then Download the GIF, again to a place that is easily found. 

Then you will need to upload the GIF to a file/picture hosting service. Photobucket, PicMonkey, etc. You will need the URL.
I use my blog: Open a new blog post, upload the GIF. 
Then, click on the GIF and click Original Size. 

Then right click and “Copy Image URL”


Once you have the long URL, shorten it using a URL shortener. I prefer Google but bit.do, bit.ly also work well. 
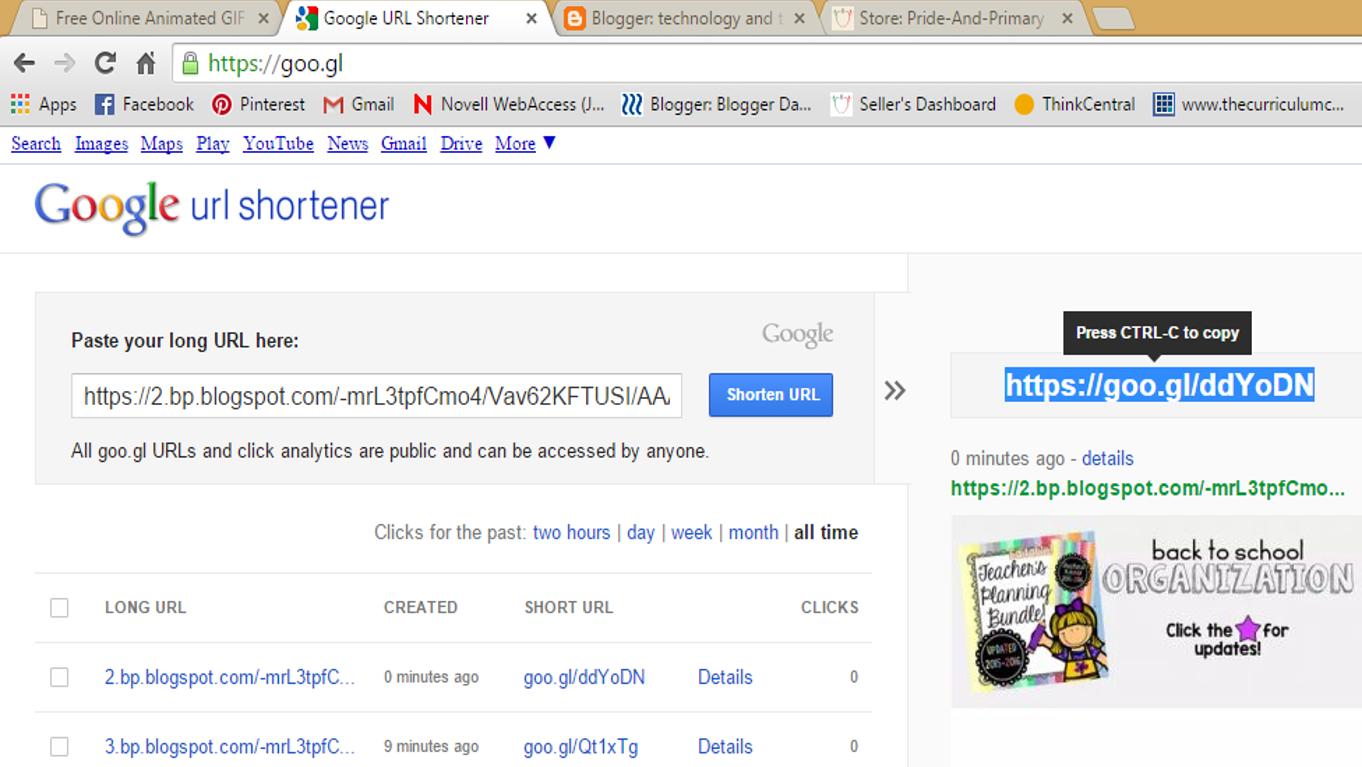
Copy that shortened URL you see highlighted. 

You don’t have to worry about that blog post your uploaded the gif to- just click close, not publish and don't delete it.

Then you need html code:

<a href=“url of the product/page you want linked”><img src=“shortened url of GIF”></a>

So mine would look like:

<a href="http://www.prideandprimary.com"><img src="https://goo.gl/74nGwr"></a>

I want my GIF to link to my blog, so I put the URL link to my blog. If you want the GIF linked to a product or somewhere else, just put that URL link instead. You may need to shorten it also, since the quote section only allows 120 characters.

And that’s it!

Just go to your account section on TpT. 
Click My Account. 
Click on Store Profile. 
Click on EDIT. 
And in the Personal Quote section, put that code you just made. 

Save and BAM. 

You’re awesome.


If you update your store, send me an email at prideandprimaryblog@gmail.com so I can come and heap praises on your storefront!!

If you post on social media, use the #proudclassroom so I can check it out! Thanks!

0

QR Codes for Listening Center

Hello! Just a quick jot tonight to share my latest remake of my listening library.
QR Codes!


I have collected A LOT of books on CD over the years and the baskets of bags aren't very attractive on the counter. Here is a picture from the beginning of the year (before the children got their hands on them!) and before I ordered more a lot more from Scholastic. I'm a sucker for new books.
It's just overflowing now. 
So I'm giving it a makeover.

Have you ever used QR codes in your classroom? They are so fun! The kids love to use the iPads and scan and listen to audiobooks.

Here's how to get started:
Put all the audiobooks onto your computer in .mp3 format.
I use Windows Media Player. Insert the CD and open Windows Media Player. Click on Rip Settings, then Format, then choose MP3
Then click Rip CD.
Once it's uploaded to your computer, you'll need to get a URL for the QR code. To get that, you'll need to upload the audio file to a file hosting site like Dropbox.
Sign in or create account.
Add a file to the Dropbox.
Once it's uploaded, click on Share.

This box pops up and there's the link you need!


Copy it.

Now, find a QR creator website that you like. I like QR Stuff. SUPER easy to use. Type in the web address and the screen you need immediately pops up.
See? Easy Peasy.

Paste the link, choose the Encoding Options, and BAM - there's your code. Click to download the code as a picture. 

I print out the picture and tape it to the back of the book. The kids can scan the code and then listen while reading along. No more CDs and paper cases and books in bags.


I'm loving this new system! 

How do you use QR codes? Anything new and easy? 

Happy teaching, 
0

First Day of School Signs! FREEBIE!!! Make it personalized with a Publisher tutorial here!

I recently made this sign for Carly's first day of school! She is a big eighth grader this year. Sniff. Time flies!!!!

I also made signs for my niece and nephew. I uploaded it to Facebook and had so many compliments and questions about how I made the signs. I've already made personalized signs for many of my friends and family.

Here is your chance to get your very own personalized sign for the first day of school!

Just click on the link below and download. Now I made the file in Publisher, so you will have to use Publisher to personalize it. I'm working on importing the file to a PowerPoint also but that will have to wait a few days.

Here's how it works:
Open the file.

Click on a Text box, then click on the Format tab. Click on Edit Text.

A text box pops up and you can change the words and font if you wish. 

To resize the text, click and drag the handles around the edge of the text box.

If you want to change the picture of the owl, click on the Insert Tab. Click on the "Online Pictures" icon. A search box pops up for you to search. You can look through Publisher's files or do an Internet Search. You can also insert your own photos by clicking on the "Pictures" icon in the Insert tab.

You will also have to download the fonts first before personalizing your sign.

These are the fonts:
Hello Heartache
Life's a Beach
KG No Regrets Sketch
A Little Sunshine
Janda Safe and Sound

Do a Google search and install.

And that's it! My sister uploaded her signs to Walgreens and had an 8 x 10 printed for around $4 bucks I believe. I printed the file as a poster on my home printer. Yep, a lot of ink and a lot bigger than I had intended, but hey, it worked!!

To print a poster do this:
Go to print the file and click on Printer Properties.

You get this pop up menu. Click on Page Layout tab at the top. 
Check the Multi Page box and then click on Poster Printing.
You can opt to print on 4 pages or two pages. See where it says 2x2? Use the up or down arrows to make bigger or smaller. I used 2x2 and then taped the pages together. 

{HERE} is the link for the signs. Click on it, then right click on the file and click DOWNLOAD. You can also download the file below. 

Thanks for reading!

0

Pom Pom Tutorial

I have been making tissue paper pom poms all day!! It has been a riot. Good times.

It's also a big mess. But my classroom is going to be so cute!! I've documented all my work and I'm going to attempt to teach you how to make them!!

First get lots of tissue paper. I buy from Dollar Tree because let's face it, I'm a teacher. You'll need at least 10 sheets of each color for each pom.
Dollar Tree has blue, green, yellow, pink, and red packs. And yellow, lilac, light pink, and light green packs. And I'm sure there's white but I wasn't looking for those.

Next, lay out 10 sheets of the color you want to make and get it as flat as you possible can. I take an iron to the stack. Put it on a low setting and iron away. It's good to do about three sheets at a time.
Then stack them up as best you can to get them even. You can use this full size and make a big pom, but you might want to add 5 more sheets of paper to fill it out. Or you can cut the paper to the size you want. 

Accordion fold the short end. 
Twist a pipe cleaner (also from the Dollar Tree) around the middle of the stacked, folded paper. 
This is also the time that I tie the ribbon from which I'm going to hang the pom. 
I'm just using regular black curling ribbon, but you can use what you wish. 

Cut both the ends either rounded or in points. I prefer rounded because it makes a prettier pom. 


It doesn't have to be perfectly rounded!! Believe me, it's not that easy. 
Fan out the papers. Then you carefully start peeling layers away from the center. 


Keep peeling layer after layer until all are done. I like to flop back and forth from one side to another to try to keep it even. 


Finally, you will have a fun, puffy pom pom!! Of course you'll kinda have to fluff and play around with it some, but it will eventually look something like this: 

Keep playing around with different sizes and cuts and you can have a whole bunch of fun poms!!


Hope this helps!! Have fun!!!

Jessica


0
Powered by Blogger.
Back to Top