Hi friends! Have you seen the latest trend on TpT? Rotating Quote pictures? They are popping up everywhere! Thought I would share with you how I made mine!

I'm starting a new series on my blog for the school year: Talking Tech with Pride and Primary!

I'm hoping to post every other Saturday with a new Tech tutorial or a new tech software or platform to share with you and your classroom or personal life!
So let's get started! First you have to make your designs. I use PowerPoint, but you can design in whatever program you are most comfortable with, as long as the finished dimensions are correct (about 600 pixels in width, height between 100-260 pixels).

Insert a rectangle that is 7” x 3.5”.

You will need to fill the rectangle with the same color as the quote section on TpT. To do that, go to the Format tab, then to Shape Fill, and click on More Colors.


On the custom tab, make the fill color R 241 G 241 B 241. Click OK.

Clear the outline on the rectangle by clicking on the Format Tab, the Shape Outline, then click on No Outline.

Make your design inside the rectangle.

Group (select all items and the rectangle) and save your design as a picture.

Right click on grouped design and click Save as Picture. Name your file and save it to a location you can easily find. The desktop is usually a good spot.

Now we have to resize and skew to the correct dimensions.
Open in Paint. You can also use Photoshop or another similar program.
Do you have extra space? We can get rid of that! But first, let's resize it.
Do you have extra space? We can get rid of that! But first, let's resize it.

Click Resize on the Home tab.

Click the Pixels circle. Change the Horizontal size to 600. The vertical size will change automatically to something around 240-270ish. Click OK.

Now get rid of the white space.


Then save the picture! I press ctrl+S. It’s the easiest way to save it under the same file name and same location, just a different size.
Repeat for the rest of your pictures. I made 4 pictures. You can make as many as you would like.
It’s ready to upload to GIF maker. Go to http://gifmaker.me/ Click on Upload Images.

Find your pictures you made and saved. Upload.

Then Download the GIF, again to a place that is easily found.

Then you will need to upload the GIF to a file/picture hosting service. Photobucket, PicMonkey, etc. You will need the URL.
I use my blog: Open a new blog post, upload the GIF.
Then, click on the GIF and click Original Size.

Then right click and “Copy Image URL”

Once you have the long URL, shorten it using a URL shortener. I prefer Google but bit.do, bit.ly also work well.
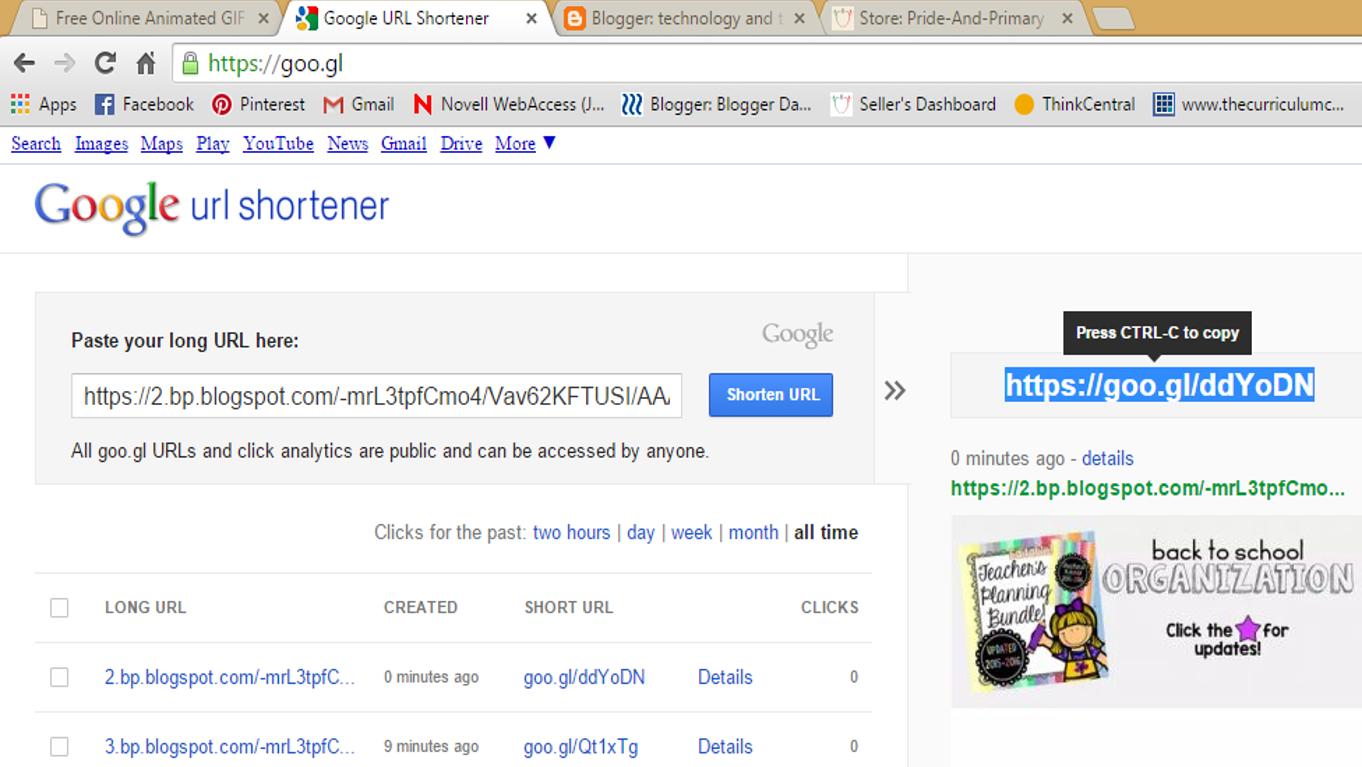
Copy that shortened URL you see highlighted.
You don’t have to worry about that blog post your uploaded the gif to- just click close, not publish and don't delete it.
Then you need html code:
<a href=“url of the product/page you want linked”><img src=“shortened url of GIF”></a>
So mine would look like:
<a href="http://www.prideandprimary.com"><img src="https://goo.gl/74nGwr"></a>
Then you need html code:
<a href=“url of the product/page you want linked”><img src=“shortened url of GIF”></a>
So mine would look like:
<a href="http://www.prideandprimary.com"><img src="https://goo.gl/74nGwr"></a>
I want my GIF to link to my blog, so I put the URL link to my blog. If you want the GIF linked to a product or somewhere else, just put that URL link instead. You may need to shorten it also, since the quote section only allows 120 characters.
And that’s it!
Just go to your account section on TpT.
And that’s it!
Just go to your account section on TpT.
Click My Account.
Click on Store Profile.
Click on EDIT.
And in the Personal Quote section, put that code you just made.
Save and BAM.
You’re awesome.
If you update your store, send me an email at prideandprimaryblog@gmail.com so I can come and heap praises on your storefront!!
If you post on social media, use the #proudclassroom so I can check it out! Thanks!
If you update your store, send me an email at prideandprimaryblog@gmail.com so I can come and heap praises on your storefront!!
If you post on social media, use the #proudclassroom so I can check it out! Thanks!